 For those of you who are new to Photoshop it is good you learn the techniques that I will review this, the discussion I will give this time is not too complicated for those of you who want to learn or understand, how the initial step to create documents, resize images, change Canvas size and many more that I will explain to you.
When we create a new document, we make what is essentially a blank canvas. We can then import images, graphics or other design assets into the document. This is usually what you want to do when creating a design layout. You simply create a new blank document with whatever size you need and then start adding and organizing your various elements.
Creating A New Photoshop Document
Click on the top left corner File then click new, or you can also use Ctrl + N on the keyboard you are using.
 |
| Click new and going to a file new. |
 |
| Document dialog box. |
- You can name the document you want to create in the name field.
- Set the size and Resolution of the document you want, or select one of the document size settings in the Preset and Size sections
- If necessary, you can choose the Color Mode and Background Color you can set.
Resize Pictures
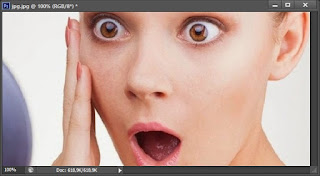
The first step, of course you open the image you want to change the size of the image, by clicking File > open, or you can also use quick steps by pressing the shortcut keys Ctrl + O.
 |
| Click and open the image. |
 |
| Example. |
 |
| An image menu dialog box. |
 |
| Image resize dialog box. |
- Change the size of the width, height, and Resolution of the picture to suit what you want.
- NOTE: Enable the Resample Image and Constrain Proportions check boxes to make the object size can be changed proportionally.
If you new user of Photoshop will be confused with canvas size, then the question arises what is canvas size ?. In this article I will explain briefly about the canvas size, canvas Size change is the field of the photo. So if using canvas size the size of the photo is fixed but the field of the photograph changed.
Now we will open the dialog box from the canvas. In the Photoshop menu there is menu image, you click the image menu and under image size click the canvas size as in the picture below.
 |
| An image menu dialog box. |
 |
| Canvas size dialog box. |
- Change the width and height of the additional canvas.
- Enable Relative checkbox.
- And click one of the image positioning buttons.
- If you want to set the color of the canvas, you can set as desired.
 |
| Example. |
Our beginners guide goes on to see how to crop images in Photoshop. You may want to crop an image if you take a good photo but too much space around the subject, or if you have a certain size and shape that you want from your image, you can use Crop Tool to achieve it.
- First, you'll need to open the image you want to crop in Photoshop.
 |
| Example. |
- Once you've opened your image, you'll need to select the Crop Tool from the toolbar

- You can either draw a new cropping area by clicking and dragging where you want it to be.
 |
| Example. |
- Once finished press enter.
 |
| Example. |
- Cutting the image means changing the size of the canvas so that it becomes smaller. If you work with multiple layers, be careful using this command, because this command will cut the images on each layer in the document.
I will tell you how to flip or rotate images with Image Rotation that Photoshop has provided. This way can also to reverse the writing, so you quickly understand it please refer to the tutorial that I will give this.
- Open the picture
 |
| Example. |
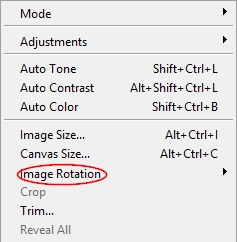
- Select the Image menu located above the options bar, and select Image Rotation.
 |
| An image menu dialog box. |
- Once you select the image rotation, you will be redirected to the image rotation dialog box.

- Select one of the commands to rotate or flip the canvas.
- For example, I will click Flip Canvas Horizontal.
 |
| This is the result. |
Make Black And White Photos With Duotone
We will learn how to create black and white effects with some color in it using Duotone. You can also use with several colors in the Duotone menu, such as using three-color and four-color.
- Open the picture
 |
| Example. |
- Choose menu image> mode> Grayscale

- Discard click and see the result
 |
| Example. |
- Then select again menu Image> Mode> Duotone
- You can set your own according to what you want, in Duotone Options there are color settings that you can choose. You can also use the preset color in the containers provide good colors without you set it.
- You can also use some colors like Tritone (three colors) and Quadtone (four colors). Because I need two colors here, then I choose Duotone.
 |
| Duotone Options. |
 |
| Example. |
The next technique, we continue to give light to the picture, sometimes when you have a photo there is a little less about the photo that is (Lighting), therefore I will tell how to give light to the photo with automatic way using Photoshop, now that you need to do, you prepare the photo or image you want to edit, for the step I give below here.
- Open the image you want to edit.
 |
| Example. |
- Choose the image menu> auto contrast, or you can also use quick steps by pressing the shortcut key Alt + Shift + Ctrl + L.
 |
| An image menu dialog box. |
- Look at the differences that occur in the image I have given light.
 |
| Example. |
- Menu command Image> Level to adjust the lighting level.
- Menu command Image> Auto Color to improve the color of the photo automatically.
HDR Effects In Photoshop
For the technique I will give again, I will give effect to the photo to be edited using HDR Toning, in Photoshop cs6 now has provided the feature to create HDR effect and the steps are not too difficult.
- Open the image you want to give HDR effect.
 |
| Example. |
- Then you go to the image menu that is above the option bar, select the adjustment and you will be directed to the existing features on the adjustment, then select the HDR Toning.
 |
| An image menu dialog box. |
- The next step, after you click HDR Toning, you will be directed to the HDR Toning dialog box and in the dialog box there are features to give effect HDR, such as: Preset, Edge Glow, Tone Detail, and Advanced.
 |
| HDR Toning dialog box display. |
- Change the Default Preset to More saturated, Edge Glow Radius to 208, Strength 1.75, Tone and Detail Gamma 0.37, Exposure -0.15, Detail +110%, Advanced Shadow 0%, Highlight -90%, Vibrance +59 %, Saturation +100%. You can also set, so that HDR effect in accordance with the object you use.
 |
| HDR Toning dialog box display. |
- Look at the difference in the results after I give effect HDR on the object that I use and the steps are not too difficult.
 |
| Example. |
I will give you tips or tricks, that is how to change the color of the image in Photoshop or how to change the color of the object, such as clothes, hats and others and I will change the color of the apple photos that I belong to using Photoshop. Now so that you can understand in the way that I will give, you prepare a photo that you will change color of the object.
- Open the image you want to change its color.
 |
| Example. |
- Select the menu Image > Adjustments > Hue/Saturation, Or you can also use quick steps by pressing the shortcut keys Ctrl + U.
 |
| Hue/saturation setting box. |
- And I will change the color of the apple to cyans color, by hitting Hue to +116, Saturation +21, and Lightness -4. You can also choose the color you want because in the Hue / Saturation setting box there are various colors, such as: red, yellow, blue, purple and others.
 |
| Hue/saturation setting box. |
- And see the results.
 |
| Example. |
We go to the tips and tricks to remove the stain on the photo, for those of you who like to take pictures less satisfied with the camera shots, which have little flaw that is a black stain on the object or Background, therefore I am here will give tips how to remove the stain On the object by using the Spot Healing Brush, just go see the steps below here.
- Open the photo you want to edit.
 |
| Example. |
- Click the Spot Healing Brush located on the Photoshop toolbar.
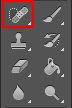
- Next step, click repeatedly on the stain that will be removed.
 |
| Example. |
- Type Proximity Match serves to cover the area of the stain with other areas that have a position closest to the stain area. While the Type Create Texture to cover the area of the stain with other areas accompanied by texture.