 From the previous tutorial I have made Disintegration Effect In Photoshop and for this tutorial I will give you a new tutorial that I named the Water Logo Effect In Photoshop, in this tutorial I use Photoshop cs6, you can also use Photoshop cs4 or Photoshop Cc.
You can see the steps below that I have given, the tutorial I made is not so difficult for beginners, I make it as easy as possible, so that the final result is satisfactory you can search on google drip water image, this material is the main part of the effect that will We make, therefore you prepare first the material, just calm many sites that provide the material for free.
This is the final image you will achieve :
 |
| The final effect. |
Add New Document
For this tutorial, we'll create a document with a Width of 1920 pixels and a Height of 1080 pixels. Set the Resolution value to 300 pixels/inch and the Background Contents to White. Then, click OK Create to create the new document.
 |
| Setting the Width, Height, Resolution and Background. |
Add A Gradient Fill Layer
Before adding text, let's make a more interesting background for the effect. To do that, we will use one of the Photoshop Gradient layers. Click on the New Fill icon at the bottom of the Layers panel.
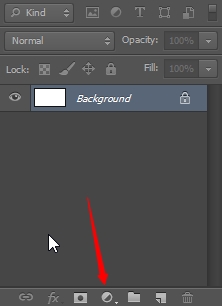 |
| Clicking the New Fill Layer icon. |
Then choose Gradient from the list.
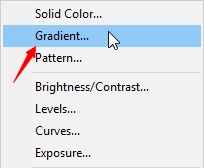 |
| Then choose Gradient from the list. |
Select Black & White In The Gradient Editor
This opens the Gradient Fill dialog box. Click on the gradient color swatch at the top. My color swatch is currently showing the Black to Transparent gradient. Don't worry if yours is showing something different.
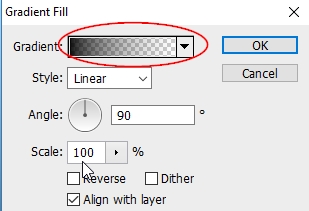 |
| Clicking the color swatch in the Gradient Fill dialog box. |
Clicking the color swatch opens Photoshop's Gradient Editor where we can create our own custom gradient and I am here not creating a new gradient. I will choose the Black and White gradient by clicking, this is the basic step to create logo effects later.
 |
| Selecting the Black, White gradient in the Gradient Editor. |
Added gradient style
I will add a style gradient from Linear to Radial, this function will add dark circles to the center of the background, but I can just adjust this step with Reverse click on the gradient dialog box under Scale.
 |
| Choose the gradient style to be radial. |
After we select the style gradient, for the next step I will adjust the Radial style that has been selected earlier, I will try to use Scale up to 298%, you can also customize with your own version if my version is less satisfactory, which I give here only inspiration for you.
 |
| Scale up to 298% and click reverse. |
This is the basic background that has been made.
 |
| And this is the result. |
Add text
Now we have the background, let's add the text that has been provided in the Photoshop toolbar select the type tool.
 |
| Select the type tool. |
With the Type Tool selected, choose your font options in the Options Bar along the top of the screen. In this case, I'll use a font called Rosewood Std. Once you've chosen your font, set the size to 72 pt. We'll resize the text manually once we've added it, but for now, this will let us start with the largest size we can choose from the list of preset sizes.
 |
| Setting the font to Rosewood Std and the size to 72 pt. |
Then, click inside the document and enter your text. I'll type the word "T P".
 |
| Typing the word T P. |
Add Your Model
Now i will add a model to Photoshop, if you want, you can also add your photo by yourself.
 |
| This is the model I use. |
Select The Quick Selection Tool
I will use the Quick Selection Tool and I will do, I will drag the face of the model using the Quick Selection Tool.
 |
| Choose quick selection tool. |
 |
| Drag in the face. |
After we drag the face of the model by using the quick selection tool, now Ctrl + J on the keyboard you are using, will appear layer 1 on the layer page as in the picture below.
 |
| Layer 1 appears on the layer page. |
Choosing Threshold
The next step we will choose Threshold, I will show you where the threshold is located, in Photoshop menu there menu Image you go to the image menu and click Adjutsments under Posterize you click the threshold directly.
 |
| Selecting threshold. |
And we will go into the Threshold box, for the next step I will adjust the Threshold Level to 70%, you can adjust as I do.
 |
| Threshold level 70%. |
This is the result we have made.
 |
| This is the result. |
Add Color Range
Now it's time to add a color range to the model, in the Photoshop menu there is a select menu, we will go to the menu and choose the color range, empty the Fuzziness on the dialog box color range.
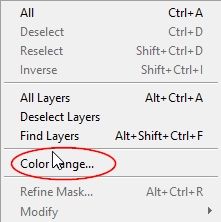 |
Choosing color range.
|
As I said above, once you get into the Threshold dialog box, leave it blank in the Fuzziness section and click OK.
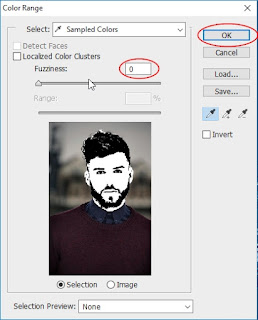 |
| Empty in the fuzziness section. |
Choose Move Tool
Then we will choose move tool in the toolbar section of Photoshop, we will move the model to the background we have created and placed it in the middle of the text.
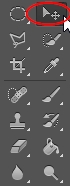 |
| Select move tool. |
You can customize the model by using CTRL + T on the keyboard you are using, more or less the result you will achieve, like in the picture below.
 |
| More or less like this. |
Add Your Text
I will add more text and you can also add text with your version, here I will add text with the title of the site that I use this is it Tutorials Photoshop 7, as you can see, for the text size I use, I use the first size 4.8 pt and for the second text size I use the size of 8.51 pt, for the text style I use, I use Sitka text style, to make the text curve, you add Warped Text using Arc style.
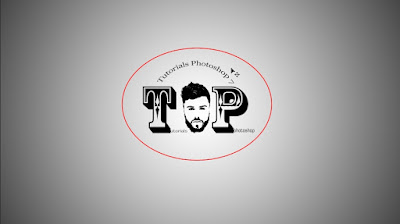 |
| The first and second text I made. |
Select Polygon Tool
In Photoshop many tools have been provided and I will choose the current polygon tool, if you want to use the ellipse tool you choose, good enough to use, because I am here to adjust the text then I choose the polygon tool.
 |
| Choosing polygon tool. |
I will place the polygon in the middle of the background that has been created earlier:
 |
| Approximately like this. |
Add Water Droplets Image
I will add water droplets to the text and the polygon becomes a pretty good color, you can also use a rainbow image if you have or something else, the tutorial that I give here is just for inspiration or just a base for you, you can set more on your own way.
 |
| I will paste this image on TP text. |
After I copy the
image, I will attach a droplet image to the TP text we have created in
the above step and use Alt + click on the mouse you are using.
 |
| Alt + click. |
And the results to be obtained will be like this:
 |
| This is the result. |
I will attach water droplets to the text, model and polygons that have been made earlier.
 |
| Add a droplet of water to the target object. |
And with that, we're done! Here, after adding a droplet image to the object, this is my final step.
 |
| The final effect. |
Hopefully the tutorial I have created is very helpful for you, if you want to see other tutorials, and can see it in the home menu pretty much the tutorial I made for you, thank you for visiting my simple website and do not forget to share.
 From the previous tutorial I have made Disintegration Effect In Photoshop and for this tutorial I will give you a new tutorial that I named the Water Logo Effect In Photoshop, in this tutorial I use Photoshop cs6, you can also use Photoshop cs4 or Photoshop Cc.


