 In this discussion I will review the basics of Photoshop that contains reviews about Adobe Photoshop work environment, the main components, the command buttons along with the function and usefulness of each element.
The Adobe Photoshop Work Environment
In general, Photoshop's working environment consists of several major components as I will explain below:
In this discussion I will review the basics of Photoshop that contains reviews about Adobe Photoshop work environment, the main components, the command buttons along with the function and usefulness of each element.
The Adobe Photoshop Work Environment
In general, Photoshop's working environment consists of several major components as I will explain below:
- Menu bar is the part that contains the command menu list.
- Toolbox is a palette containing command buttons, such as:
Command buttons for selecting, chopping, editing, drawing, writing text and other functions.
- Options bar is the part that contains a list of additional commands whose contents will always change depending on the command button selected in the Toolbox section.
- Document is a master works sheet containing the image, object or text currently in the process.
- Panel is a part consisting of several pallets. The pallets contain several commands to manipulate the document.
In Photoshop, the display panel has been equipped with two complementary buttons are:
- Buttons

 that serves to open and close the panel window
- Panel menu button
 that serves to display the menu list and the contents of the menu list adjust to the currently active palette.
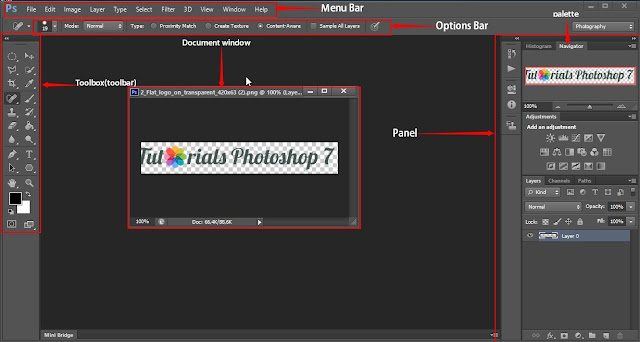 |
| Picture the work environment Photoshop. |
When working with documents, sometimes you need a large work space. Use one of the commands below to extend the Photoshop workspace:
- Press Tab to hide all components except the document window.
- Press Shift + Tab to hide all components except document window and Toolbar.
Some of the command buttons in the Toolbar are accompanied by a triangle in the right corner of the button that serves to display the other command buttons contained within it.
 |
| Corner Button. |
The following is an explanation of the name and function of the command buttons contained in the Toolbar:
 Rectangular Marquee
 Elliptical Marquee
 Single Row Marquee
 Single Column Marquee
It functions to select objects with rectangles, ellipses, single rows, and single columns.
 Move Tool function to select layer and move selection area.
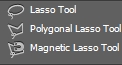 |
| Lasso Tool. |
- Lasso Tool => to create a free selection area.
- Polygonal Lasso Tool => for making selection area with polygonal pattern.
- Magnetic Lasso Tool => to create a selection area based on tonal color difference.
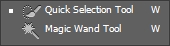 |
| Quick Tool. |
- Quick Selection Tool => to make a selection based on tonal color area selected by the mouse brush tip.
- Magic Wand Tool => to create a selection area based on similar colors.
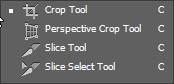 |
| Crop Tool. |
- Crop Tool => to cut a certain part of the image. Use of this tool will affect other images in all layers.
- Perspective Crop Tool => to adjust the angle.
- Slice Tool => to cut or split the image into sections.
- Slice Select Tool => to select the area of the cropped image.
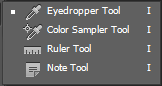 |
| Eyedropper Tool. |
- Eyedropper Tool => used to take color samples in the image section. To use this tool, click on a certain area of the image, the selected color will be taken for example. Each time you take a color sample on a particular image area on a canvas, inside Panel Color will display the combination of colors that make up the color sample.
- Color Sampler Tool => to take a color sample as well as to display every color selected in the info panel in the form of color value.
- Ruler Tool => to measure the object, the distance of the location and the angle on the worksheet.
- Note Tool => to make notes on the picture.
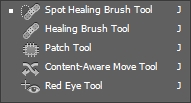 |
| Spot Healing Brush Tool. |
- Spot Healing Brush Tool => to remove certain parts of the image by adjusting the color with its surroundings. This method is suitable for removing defects from images such as acne or scratches.
- Healing Brush Tool => to close the stain by: ALT and CLICK the image area is still good and click on the image of the stained area.
- Patch Tool => to close the stain by taking another image area to cover the image of the stained area.
- Content Aware Move Tool => is a new facility in Photoshop that serves to move objects to other parts and automatically adjust the area with surrounding objects.
- Red Eye Tool => to eliminate the effect of red eyes due to glare of light.
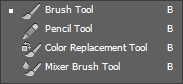 |
| Brush Tool. |
- Brush Tool => to create a brush streak.
- Pencil Tool => to create a pencil stroke.
- Color Replacement Tool => to change the color of the selected image or click the first time with another color.
- Mixer Brush Tool => to give polish by mixing brush color and color of image.
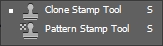 |
| Clone Stamp Tool. |
- Clone Stamp Tool => to duplicate a particular image area to another area.
- Pattern Stamp Tool => to duplicate the pattern or pattern of an image.
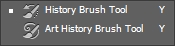 |
| History Brush Tool. |
- History Brush Tool => to create a brush polish combined with the last command you apply.
- Art History Brush Tool => to create a brush polish, but this one is more varied than you can specify as you wish.
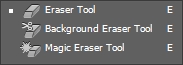 |
| Eraser Tool. |
- Eraser Tool => to remove a certain image area.
- Background Eraser Tool => to delete an image based on the color of the image that was first clicked, so that the image is visibly transparent.
- Magic Eraser Tool => to automatically remove certain color areas of the image.
 |
| Gradient Tool. |
- Gradient Tool => to form a color gradation with a wide selection of types and patterns of gradation.
- Paint Bucket Tool => to fill an image area that has a color similar to the foreground color.
- 3D Material Drop Tool => to give 3D colors to images or layers.
 |
| Blur Tool. |
- Blur Tool => to blur the color.
- Sharpen Tool => to sharpen the color
- Smudge Tool => to give effect like rubbing fingers on wet paint.
 |
| Dodge Tool. |
- Dodge Tool => to brighten and whiten parts of the image that look dark.
- Burn Tool => to darken part of the image that looks bright.
- Sponge Tool => to increase or decrease the color contrast in the image.
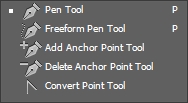 |
| Pen Tool. |
- Pen Tool, Freeform Pen tool => pen and Freeform pen to create straight-line or curved paths and paths with free-line patterns.
- Add Anchor Point Tool => to add anchor point to a path
- Delete Anchor Point Tool => to change the anchor point on a path object.
- Convert Point Tool => to change the type of anchor point from a straight line into a curved line and vice versa.
 |
| Type Tool. |
- Horizontal Type Tool => To create text in horizontal direction.
- Vertical Type Tool => To create text in vertical direction.
- Horizontal Type Mask Tool => To create a text selection area with a horizontal direction.
- Vertical Type Mask Tool => To create a text selection area with vertical direction.
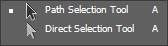 |
| Path Tool. |
- Path Selection Tool => to select and move the path position.
- Direct Selection Tool => to select one or more points and change the path shape.
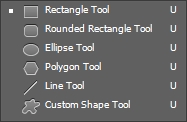 |
| Shape Tool. |
- Rectangle Tool => to create a box object.
- Rounded Rectangle Tool => to create a box object with a dull angle.
- Ellipse Tool => to create an elliptical object.
Press shift and drag the mouse to create a Circle.
- Polygon Tool => to create a multi-faceted object / star /
Line Tool => to create a line.
Press shift and drag the pointer to form a horizontal straight line and have a dash.
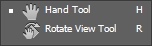 |
| Hand Tool. |
- Hand Tool => to pan and adjust the position of the image in the document window.
- Rotate View Tool => to rotate the image in a working document.
 |
| Zoom. |
- Zoom Tool => o increase the size of the image display, or press Alt when clicking to zoom out.
 |
| F.B Tool. |
- To select the Foreground color (top box) and Background (bottom box). Click one of the boxes to change the color.
Press D to use the default (black and white) warrants order. Press X to flip the Foreground and Background colors.
- Quick Mask Mode => To process image files or photos into normal mode and Quick Mask.
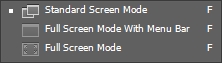 |
| Screen Mode Tool. |
- Standard Screen Mode => Set the display mode of the Photoshop workspace in the standard display format.
- Full Screen Mode With Menu Bar => Set the display mode of the Photoshop workspace in full-view format with the menu bar.
- Full Screen Mode => Set the display mode of the Photoshop workspace in full-view format without the menu bar.
Palette is a section containing information from an active document or some commands to manipulate the image object or document text.
Navigator Palette
This palette to set the percentage of image display size in the active document, that is by sliding the zoom slider, clicking the Zoom Out or Zoom In button, or type the percentage of the image in the Zoom box.
Palette Histogram
This palette contains the color tonal information that images or objects have.
Info Palette
This palette contains the mouse position information in the document, the color values, the size of the selected image area, and the size of document file.
Palette color
This palette to change the color of Foreground or background by clicking on the color box, then slide to select the color.
Palette Swatches
This palette works to change the foreground or background color by clicking on the color box or selecting the foreground color, press Ctrl and Click the color box to select the background color.
And that's a simple tutorial that I can give to you, hopefully what I have given for you useful, do not forget to help distribute the tutorial that I have, you also can see other tutorials that exist in the home menu.
 In this discussion I will review the basics of Photoshop that contains reviews about Adobe Photoshop work environment, the main components, the command buttons along with the function and usefulness of each element.


