
In this Photoshop tutorial, we'll learn how to easily give someone a full Foreground blue eyes! I will use Photoshop CS6 here but every step is also compatible with Photoshop CC.
I'm thinking about this idea while working on the previous photo effects tutorial. I've seen other people create a rainbow effect by manually painting different colors to the eyes using Photoshop's Brush Tool and then blurring the colors together. But here I have a little different way I just see you way below.
I'm thinking about this idea while working on the previous photo effects tutorial. I've seen other people create a rainbow effect by manually painting different colors to the eyes using Photoshop's Brush Tool and then blurring the colors together. But here I have a little different way I just see you way below.
As
we will see, the method we will use to create blue eyes gives us plenty
of room to play around. Along with the basic rainbow effect, we will
learn how to make different variations easily, such as reversing the
color sequence, rotating colors around the eyes, and even selecting
different styles and designs. And, we can do it for each eye
independently,
and all without making a permanent change to its original image.
Select Gradient Map
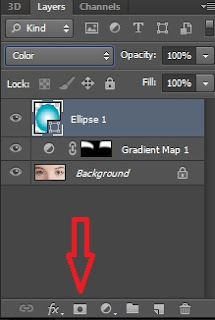
I started here with my newly opened image in Photoshop. If we look in the Layers panel, we see the original image in the document, click Gradient Map as shown in the picture below.


Set The Default Blend Mode To Lighten
At this time, the gradient fills the shape of the model. To blend gradient colors with the model, change the Shape layer blend mode from Normal (standard blend mode) to Lighten!


Select The Ellipse Tool
After the above step is completed we go to change the eyes with blue eyes
As we will see, we can create Blue Eye Effects using one tool, the Ellipse Tool, which is one of the basic tools of Photoshop. Select the Ellipse Tool from the Toolbar.

Set The Tool Mode To "Shape"
With
the Ellipse Tool selected, set the Tool Mode option in the Options Bar
along the top of the screen to Shape. This will allow us to draw vector
shapes (as opposed to paths or pixel-based shapes, the other options
available to us. Next change the fill type to Gradient.

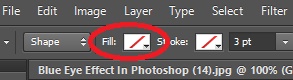
Along the top of the Fill Type dialog box that appears, you will find a row of four thumbnails. Each thumbnail selects a different way to fill its shape. From left to right, we have No Color, Solid Color, Gradient, and Pattern. There is also a fifth thumbnail on the far right that opens Photoshop's Color Picker where you can choose custom colors, for blue eye effect we want to fill the form with the gradient, so click on the Gradient thumbnail.
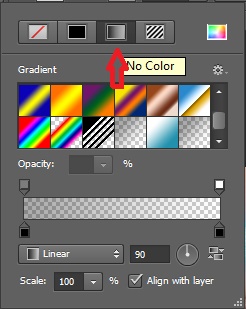
Choose The "Foreground" Gradient
With Gradient selected as the fill type, scroll down through the gradient until you find the Foreground gradient. If you enable Tools Tip in Photoshop Preferences (enabled by default), the gradient name will appear when you mouse over the thumbnail. Click on the gradient foreground thumbnail to select it and change the gradient style to Radial -90.
With Gradient selected as the fill type, scroll down through the gradient until you find the Foreground gradient. If you enable Tools Tip in Photoshop Preferences (enabled by default), the gradient name will appear when you mouse over the thumbnail. Click on the gradient foreground thumbnail to select it and change the gradient style to Radial -90.


Draw Elliptical Over The First Eye
Release your mouse button, Make sure you release the button only after you release the mouse button or you will lose the effect that the key has.
As soon as you release your mouse button, Photoshop draws the shape and fills it with a Foreground Gradient.

Change The Shape Layer's Blend Mode To Color


The result after changing the shape blend mode to "Color".
Add A Layer Mask
To
clean up the areas around the iris where we don't want the gradient
colors to appear, we'll use a layer mask. With the Shape layer still
selected, click the Layer Mask icon at the bottom of the Layers panel.
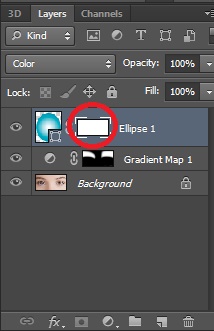
A
white-filled layer mask thumbnail will appear on the Shape Layer.
Notice the highlight border around the thumbnail. The border tells us
that we now have the layer mask, not the shape itself, selected, which
means that anything we do next will be done to the mask, not to the
shape.
Select The Brush Tool
Clean the unwanted areas around the eyes by using the Brush Tool to look neat and set your foreground color to black.
Photoshop uses the current Foreground color as the brush color, which means that to paint with black, we need to set our Foreground color to black. We can see the current Foreground and Background colors in the two color swatches near the bottom of the Toolbar. The Foreground color is the one in the upper left.


With the Brush Tool in hand, black as your Foreground color and the layer mask selected, simply paint around the outside of the iris to hide the unwanted colors from the gradient.


Customizing The Effect
Now
that we've created the initial blue-colored eyes effect, let's learn
how we can easily customize it and create different variations. We do
that by editing the gradient settings.
To edit the gradient settings for one of the eyes, double-click on its Shape thumbnail in the Layers panel, and after you open the gradient fill change the angle to -90 degrees then click OK.


Okay friends do with the same thing if you want to color the right eye.
|
| This is the final result. |